The project: https://github.com/kazurayam/NeoGOF
1. Overview
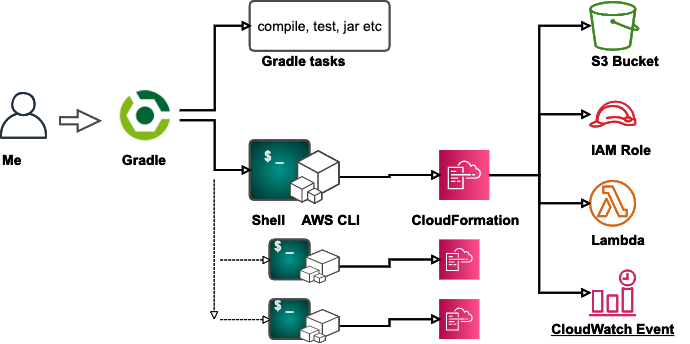
Build and Delivery by the toolset of Gradle + Shell + AWS CLI + CloudFormation (new Gang of Four) makes life easy for Java/Groovy/Kotlin developers.
1.1. Problem to solve
-
I have a few One Man projects. I want to develop Applications in Java/Kotlin. And I want to provision AWS resources for them myself. No division of labour there.
-
I want to use Gradle Build Tool to achieve Continuous Delivery. By one command
$ gradle deploy, I want to achieve all tasks for developing applications in Java/Kotlin language which should run as AWS Lambda Functions. -
I want to use Gradle to do compiling, testing and archiving my Java applications as usual.
-
I want to automate provisioning a AWS S3 Bucket where I locate the jar file containing my Lambda functions.
-
I want to automate uploading the jar file up to the designated S3 Bucket every after I modify the application source and rebuild it.
-
I want to automate provisioning other various AWS resources: AWS Lambda Functions, CloudWatch Event Rules, IAM Roles, Simple Queue Service, Simple Notification Service, etc. In order to accomplish these complex tasks, I want to use AWS Provisioning Tool CloudFormation.
A question came up to me. How to make full use of AWS CloudFormation functionalities in a Gradle build.gradle script?
1.2. Solutions
I found 2 possible approaches.
-
use combination of Gradle + Shell + AWS CLI + CloudFormation. The
build.gradlescripts calls built-inExectask which executes an external shellawscli-cooked.shwhich executes AWS CLI to drive CloudFormation. -
use a Gradle AWS plugin jp.classmethod.aws. This plugin adds a lot of custom Gradle tasks for managing various AWS resources including CloudFormation.
I did research for a few days and got a conclusion that the Gang of Four toolset is better than a single Gradle plugin.
I will explain how the Neo GOF toolset works first. Later I will also explain what I found about the plugin.
1.3. Prerequisites
-
Java 8 or higher
-
Bash shell. On Windows, I installed Git for Windows and got "Git Bash" bundled in it.
-
AWS Account for my use
-
IAM User with enough privileges.
-
AWS CLI installed and configured on Mac or PC. The
defaultprofile in~/.aws/configfile is configured to point my privileged IAM User. -
I used Mac, though this project should work on Windows and Linux as well.
1.4. Project directory structure
The NeoGOF project is a Gradle Multi-project, which comprises with 5 sub-projects.
$NeoGOF
├─app
├─subprojectA
├─subprojectB
├─subprojectC
└─subprojectD
On Commandline UI, I would cd to the rootProject, and execute ./gradlew command.
For example, the hello task of the rootProject will call each hello tasks defined
each sub-projects.
$ cd $NeoGOF
$ ./gradlew -q hello
Hello, app
Hello, subprojectA
Hello, subprojectB
Hello, subprojectB
Hello, subprojectD
Hello, rootProject
Or, you can execute a specific task of a subproject by typing
:<subPorjectName>:<taskName>.
For example;
$ cd $NeoGOF
$ ./gradlew -q :subprojectA:hello
Hello, subprojectA
1.5. Remarks
You can download an zip archive of the project from the Releases page. Provided that you have seasoned experience of using Gradle you should be able to play on this project. If you want to try yourself, you need to know a few stuff.
1.5.1. S3 Bucket names need to be globally unique
If you are going to try running this project on your PC, there is one thing you need to edit.
In gradle.properties file, you will find such line:
S3BucketNameA=bb4b24b08c-20200406-neogof-a
This line specifies the name of a AWS S3 Bucket to be provisioned. As you possibly are aware of, a S3 Bucket name must be globally unique. The example bucket name starting with bb4b24b08c is mine, not for your use. So you need to edit the gradle.properties file so that you give alternative names for your own use. I would recommend you to replace the leading bb4b24b08c part
with some other string.
1.5.2. One-liner to generate your identity
You want to generate your identity to make your S3 Bucket names globally unique. Ok, you can generate a mystified (possibly globally unique) 10 characters based on your AWS Account ID (12 digits) by the following shell command. Here I assume that you have AWS CLI installed:
$ aws sts get-caller-identity --query Account | md5sum | cut -c 1-10
1.5.3. *.sh files need to be executable
Another thing you need to be aware. Once cloned out, it is likely that you need to change mode of *.sh files to make them executable. I mean, you may want to do:
$ cd $NeoGOF
$ chmod +x ./awscli-cooked.sh
$ chmod +x ./subprojectD/awscli-cooked.sh
2. Descriptions
2.1. Neo GOF toolset
You can locate the project anywhere on your PC. For example, I have cloned out this project to a local directory /Users/myname/github/NeoGOF. In the following description, I will use a symbol $NeoGOF
for short of this local path.
2.1.1. Head-first demonstration
In Bash commandline, type
$ cd $NeoGOF
$ ./gradlew -q deploy
Then the following output will follow if successful:
neogof-0.1.0.jar has been built
created /Users/myname/github/NeoGOF/subprojectD/build/parameters.json
{
    "StackId": "arn:aws:cloudformation:ap-northeast-1:840000000000:stack/StackD/99bd96c0-78c9-11ea-b8e1-060319ee749a"
}
Neo GOF project has been deployed
Here I wrote 840000000000. This portion is the 12 digits of my AWS Account ID. You will see different 12 digits of your AWS Account ID when you try for yourself.
Executing ./gradlw deploy is designed to provision 2 AWS resources.
1. a S3 Bucket named bb4b24b08c-20200406-neogof-d
2. a IAM Role named NeoGofRoleD
Many things will be performed behind the sean. Let me follow the code and explain the detail.
When you type gradlew deploy, the deploy task defined in the
NeoGOF/build.gradle is executed.
task deploy(dependsOn: [
        ":app:build",
        ":subprojectD:createStack"
]) {
    doLast {
        println "Neo GOF project has been deployed"
    }
}
The deploy task calls 2 tasks: :app:build and :projectD:createStack; and when they finished the deploy task shows a farewell message. Of course you can execute these tasks independently as:
$ cd $NeoGOF
$ ./gradlew :app:build
...
$ ./gradlew :subprojectD/createStack
...
The app sub-project is a small Gradle project with java plugin applied.
The app sub-project contains a Java class example.Hello.
The class implements
com.amazonaws.services.lambda.runtime.RequestHandler.
Therefore the example.Hello class can run as a AWS Lambda Function.
The build task of the app project compiles the Java source and build a jar file. The app project is a typical Gradle project and has nothing new.
The subprojectD sub-project indirectly activates AWS CloudFormation to provision S3 Bucket and IAM role.
Please note, the deploy task combines a Gradle built-in feature (building Java application) and a extended feature (driving AWS CloudFormation) just seamlessly.
2.1.2. Internal of the :subprojectD:createStack task
The createStack task in
subprojectD/build.gradle
file is like this:
task createStack {
    doFirst {
        copy {
            from "$projectDir/src/cloudformation"
            into "$buildDir"
            include 'parameters.json.template'

            rename { file -> 'parameters.json' }
            expand (
                    bucketName: "${S3BucketNameD}"
            )
        }
        println "created ${buildDir}/parameters.json"
    }
    doLast {
        exec {
            workingDir "${projectDir}"
            commandLine './awscli-cooked.sh', 'createStack'
        }
    }
}
The createStack task does two things.
First it executes a copy task.
The copy task prepares a set of parameters to be passed to CloudFormation Template. It copies a template file into build/parameters.json while interpolating the $bucketName symbol in the template to the value specified in the rootProject/gradle.properties file.
Let me show you an example how parameter.json file is prepared.
Firstly, the template:
[
  {
    "ParameterKey": "S3BucketName",
    "ParameterValue": "${bucketName}"
  }
]
Secondly, the values defined:
...
S3BucketNameD=bb4b24b08c-20200406-neogof-d
...
Finally, the output:
[
  {
    "ParameterKey": "S3BucketName",
    "ParameterValue": "bb4b24b08c-20200406-neogof-d"
  }
]
The sub_createStack function in awscli-cooked.sh file will pass the generated $buildDir/parameters.json to CloudFormation.
Thus you can transfer the parameter values defined in the Gradle world into the CloudFormation Template world.
OK, a Aha! comes here.
The createStack task in subprojectD/build.gradle executes
a exec task which executes an external bash script file awscli-cooked.sh with sub-command createStack.
Let’s have a quick look at the code fragment:
sub_createStack() {
    aws cloudformation create-stack --template-body $Template --parameters $Parameters --stack-name $StackName --capabilities CAPABILITY_NAMED_IAM
}
Any AWS developer will easily see what this shell function does. The shell function sub_createStack invokes AWS CLI to activate CloudFormation for creating a Stack with several options/parameters specified as appropriate.
The shell script awscli-cooked.sh] implements a few other subcommands: deleteStack, describeStacks, validateTemplate. All of these subcommands are one-liners which invoke AWS CLI to activate CloudFormation.
Simple and easy to understand, isn’t it?
2.2. Gradle AWS Plugin
Visit Gradle Plugins Repository and make a query with keyword aws. You will find quite a few Gradle plugins that enables managing AWS resources. I picked up jp.classmethod.aws. I will show you what I tried with this plugin.
2.2.1. subprojectA: create a S3 Bucket using dedicated Task
In the commandline with bash, I can try this:
$ cd $NeoGOF
$ ./gradlew :subprojectA:createBucket
Then I got a new S3 Bucket is successfully created in my AWS Account.
In the subprojectA/build.gradle file, I have the following task definition:
task createBucket(type: CreateBucketTask) {
    bucketName "${S3BucketNameA}"
    region "${Region}"
    ifNotExists true
}
The CreateBucketTask is a task provided by the Gradle plugin jp.classmethod.aws.
2.2.2. subprojectB: create a S3 Bucket using CloudFormation via plugin
In the commandline with bash, I can try this:
$ cd $NeoGOF
$ ./gradlew :subprojectB:awsCfnMigrateStack
Then I got a new S3 Bucket is successfully created in my AWS Account.
In the subprojectA/build.gradle file, I have the following task definition:
cloudFormation {
    stackName 'StackB'
    stackParams([
            S3BucketName: "${S3BucketNameB}"
    ])
    capabilityIam true
    templateFile project.file("src/cloudformation/B-template.yml")
}
// awsCfnMigrateStack task is provided by the gradle-aws-plugin
// awsCfnDeleteStack  task is provided by the gradle-aws-plugin
The awsCfnMigrateStack task is a dedicated task provided by the Gradle plugin jp.classmethod.aws
to activate AWS CloudFormation.
The subprojectB/src/cloudformation/B-template.yml is the Template for CloudFormation Stack. It contains such code fragment:
Resources:
  S3Bucket:
    Type: AWS::S3::Bucket
    Properties:
      BucketName: !Sub ${S3BucketName}
      AccessControl: Private
      PublicAccessBlockConfiguration:
        BlockPublicAcls: True
        BlockPublicPolicy: True
        IgnorePublicAcls: True
        RestrictPublicBuckets: True
This is a typical CloudFormation code that creates a S3 Bucket.
2.2.3. subprojectC: failed to create a IAM Role using CloudFormation via plugin
In the commandline with bash, I can try this:
$ cd $NeoGOF
$ ./gradlew :subprojectC:awsCfnMigrateStack
When I tried it, it failed.
stack subprojectC not found

> Task :subprojectC:awsCfnMigrateStack FAILED

FAILURE: Build failed with an exception.

* What went wrong:
Execution failed for task ':subprojectC:awsCfnMigrateStack'.
> Requires capabilities : [CAPABILITY_NAMED_IAM] (Service: AmazonCloudFormation; Status Code: 400; Error Code: InsufficientCapabilitiesException; Request ID: c1abb0f1-29c9-4679-9ca1-ccb862ff83f0)
The subprojectC/build.gradle script contains a similar code fragment as subprojectBA/build.gradle. But it reads another CloudFormation Template YAML
subprojectC/src/cloudformation/C-template.yml. The C-template.yml file contains a portion:
Resources:

  NeoGofRole:
    Type: AWS::IAM::Role
    Properties:
      AssumeRolePolicyDocument: ./src/iam/assume-role-policy-document.json
      RoleName: NeoGofRoleC
This portion requires CloudFormation to provision a IAM Role named NameGofRoleC.
2.2.4. Root cause of failure
Why $ ./gradlew :subprojectC:awsCfnMigrateStack failed with message
Error Code: InsufficientCapabilitiesException?
The root cause is already known by the plugin developers. See the following issue in the Project’s Issue list.
You can see this issue was opened 4 years ago, July 2016, and is still outstanding in April 2020.
The plugin was initially developed in 2016. Later in 2017, CAPABILITY_NAMED_IAM was added in AWS CloudFormation spec. Obvisously you see, the plugin has not been maintained and is now outdated.
The originator of jp.classmethod.aws miyamoto-daisuke commented in a open issue RDS Instance Support.
It is hard for me alone to implement all AWS product's feature. So I start to implement the features which I need now. I think that this plugin should have all of useful feature to call AWS API.
Everyone can contribute to add useful features to this plugin. I appreciate your pull-requests.
So, the plugin failed to keep in pace with the rapid and continuous development of AWS services.
3. Conclusion
I want to express my appreciations and respects to the developers of the Gradle AWS Plugin jp.classmethod.aws. However the plugin is already outdated and probably will not be maintained any longer as the maintainer passed away.
On the other hand, we have AWS CLI and CloudFormation; these are the AWS primary products. I can assure you that a Gradle build.gradle can execute CloudFormation via Shell script calling AWS CLI in long term to go. You can invoke everything needed to deploy your Lambda function in Java into your production environment by one stroke of command. The combination of Gradle + Shell + AWS CLI + CloudFormation (Neo Gang of Four) is a powerful toolset to achieve Continuous Delivery.
Here I presented a few Shell scripts and build.gradle scripts. All of them are simple. Customizing them will be a breeze.
end